Saturday, May 21, 2011

Migrating Access Jet Databases to SQL Azure


I’ll describe how to use SSMA for Access to convert your Jet database for your Microsoft Access solution to SQL Azure. This blog builds on Access to SQL Server Migration: How to Use SSMA using the Access Northwind 2007 template. The blog also assumes that you have a SQL Azure account setup and that you have configured firewall access for your system as described in the blog post Migrating from MySQL to SQL Azure Using SSMA

Creating a Schema on SQL Azure

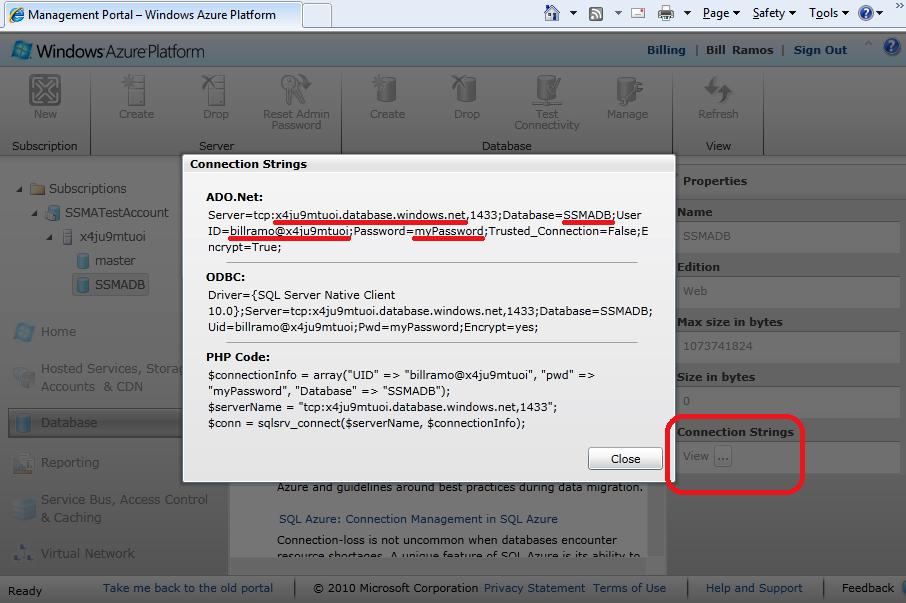
If you are using a trial version of SQL Azure, you’ll want to get the most out of your free 1 GB Web Edition database. By using a SQL Server schema, you can accommodate multiple Jet database or MySQL migrations into a single database and limit access to users for each schema via the SQL Server permissions hierarchy. SSMA for Microsoft Access version 4.2 doesn’t support the creation of a database schema within the tool, so you will need to create the schema using the Windows Azure Portal. Launch the Windows Azure Portal with your Live ID and follow the steps as shown below. 
 
 
  1. Click on the Database node in the left hand navigation pane.
  2. Expand out the subscription name for your Azure account until you see your databases
  3. Select the target database that you created when you first connected to the Azure portal – see Migrating from MySQL to SQL Azure Using SSMA for how the SSMADB was created for this blog.
Click on the Manage command to launch the Database Manager. You will log in into SQL Azure database as shown below. 


Once in the Database Manager, you will need to press the New Query command as shown below so that you can create the target schema for the Northwind2007 database.
Now that you have the new query window, you can do the following steps as illustrated below.


  1. Type in the Transact-SQL command to create your target schema: create schema Northwind2007
  2. Press the Execute command in the toolbar to run the statement.
  3. Click on the Message window command to show that the command was completed successfully.
You are now ready to use SSMA for Access to migrate your database to SQL Azure into the Northwind2007 schema.

Creating a Migration Project with SQL Azure as the Destination

Start SSMA for Access as usual, but close the Migration Wizard that starts by default. The Migration Wizard will end up creating the tables in the dbo schema instead of the Northwind2007 schema that you created. Follow the steps shown below to create your manual migration project.
  Click on the New Project command.
  1. Enter in the name of your project.
  2. Select SQL Azure for the Migration To option and click OK. If you forget to select SQL Azure, you’ll need to create a new project again because you can’t change the option once you have competed the dialog.
The next step is to add the Northwind2007 database file to the project and connect to your SQL Azure database as shown below.
 Click on the Add Databases command and select the Northwind2007 database.
  1. Expand the Access-metadata node in the Access Metadata Explorer to show the Queries and Tables nodes and select the Tables checkbox.
  2. Click on the Connect to SQL Azure command
  3. Complete the connection dialog to your SQL Azure database

Choosing the Target Schema

To change the target schema, you need to Modify the default value from master.dbo to database name and schema that you created for your SQL Azure database – in this example – SSMADB.Northwind2007 following the steps below.
 
Click on the Modify button in the Schema tab.
  1. Click on the […] brose button in the Choose Target Schema dialog.
  2. Choose the target schema – Northwind2007 - and then click the Select and the OK button.

Migrate the Tables and Data with the Convert, Load, and Migrate Command

At this point, you are ready to proceed with the standard migration steps for SSMA which includes (ignoring errors):
  1. Click on the Tables folder for the Northwind2007 database in the Access Metadata Explorer to enable the migration toolbar commands.
  2. Click on the Convert, Load, and Migrate command to do all the steps to compete the migration with the one command.
Click OK for the Synchronize with the Database dialog as shown below to create the tables in the Northwind2007 schema within the SSMADB database. 
2. Dismiss the Convert, Load, and Migrate dialog assuming everything worked.

Using SSMA to Verify the Migration Result

To verify the results, you can use the Access and SQL Azure Metadata Explorers to compare data after the transfer as follows.


Click on the source table Employees in the Access Metadata Explorer
  1. Select the Data tab in the Access workspace to see the data
  2. Click on the target table Employees in the SQL Azure Metadata Explorer
  3. Select the Table tab in the SQL Azure workspace to see the schema or the Data tab to view the data.
You can also use the SQL Azure Database Manager to view the table schema and data as described at the end of the blog post Migrating from MySQL to SQL Azure Using SSMA.

Creating Linked Tables to SQL Azure for your Access Solution

To make your Access solution use the SQL Azure tables, you need to create Linked tables to the SQL Azure database. To create the Linked tables, you need to select the Tables folder in the Access Metadata Explorer as shown below.

Right click on the Tables folder and select the Linked Tables command. SSMA will create a backup of the tables in your Access solution file and then create the Linked Table that connects to the table in SQL Azure.
Check Video Migrate Your Database to SQL Azure


Migrating Data into SQL Server Using SSMA


SSMA provides flexibility for you to migrate your data with one of the two options below: 

1.            Client side data migration engine : This option migrate data through the client machine where SSMA is installed and provides a quick and easy way to migrate smaller database into SQL Server.
2.            Server side data migration engine: this option migrate data directly from the source database to the target database and should be considered when migrating large database
In order to enable server side data migration engine, you will need the following:

1.            Install SSMA Extension Pack
SSMA extension pack installation file comes in the SSMA download but requires separate installation:
 2.            SQL Server Agent
The data migration operation is initiated from SQL Server through a SQL Agent job.

Note that SSMA provides a warning when connecting to target when SQL Server Agent is not running:  "Common Requirement: SQL Server Agent is not running. You must start SQL Server Agent to use Server-side data migration engine". You can ignore this warning if you do not plan to perform data migration or if you decide to use client side data migration engine.
 You can set the data migration option through the project setting:

1.            Navigate to Tools menu and go to Project Settings
2.            Select the migration engine option from the Migration menu


Thursday, May 19, 2011

Migrating from MySQL to SQL Azure Using SSMA


In this blog post, I will describe how to setup your trial SQL Azure account for your migration project, create a “free” database on SQL Azure and walkthrough differences in the process of using SSMA to migrate the tables from the MySQL Sakila sample database to SQL Azure. For a walkthrough of how to migrate a MySQL database to SQL Server, please refer to the post “MySQL to SQL Server Migration:How to use SSMA”. This blog assumes that you have a local version of the MySQL Sakila-DB sample database already installed and that you have  SQL Server Migration Assistant for MySQL v1.0 (SSMA) installed and configured using the instructions provided in the “MySQL to SQL Server Migration: How to use SSMA” blog post.

Getting Started with SQL Azure

If you don’t have a SQL Azure account, you can get a free trial special at http://www.microsoft.com/windowsazure/offers/ through June 30th, 2011. The trial includes a 1GB Web Edition database. Click on the Activate button to get your account up and running. You’ll log in with your Windows Live ID and then complete a four step wizard. Once you are done, the wizard will take you to the Windows Azure Platform portal. If you miss this trail, stay tuned for additional trial offers for SQL Azure.


The next step is to create a new SQL Azure Server by clicking on the “Create a new SQL Azure Server” option in the Getting Started page. You will be prompted for your subscription name that you created in the wizard, the region where your SQL Azure server should be hosted, the Administrator Login information, and the firewall rules. You will need to configure the firewall rules to specify the IPv4 address for the computer where you will be running SSMA.


Click on the Add button to add your firewall rule. Give it a name and then specify a start and end range. The dialog will display your current IPv4 address so that you can enter it in for your start and end range.


Once your are done with the firewall rules, you can then click on your subscription name in the Azure portal to display the fully qualified server name that was just created for you. It will look something like this: x4ju9mtuoi.database.windows.net. You are going to use this server name for your SSMA project.

Using the Azure Portal to Create a Database

SSMA can create a database as part of the project, but for this blog post I’m going to walk through the process of creating the database using the portal and then use the SSMA feature to place the resulting database in a schema within the database. Within the Azure portal, with the subscription selected, you will click in the Create Database command to start the process.


Enter in the name of the database and then keep the other options as the defaults for your free trial account. If you have already paid for a SQL Azure account, you can use the Web edition to go up to 5 GB or switch to the Business edition to up the size limit between 10GB and 50GB. Once created, you will want to click on the Connection Strings – View button to display the connection string information you will use for your SSMA project shown below. The password value shows just a placeholder value.

You are now ready to setup your SSMA project.

Using SSMA to Migrate a MySQL Database to SQL Azure

Once you start SSMA, you will click on the New Project command shown in the image below, enter in the name of the project, and select the SQL Azure option for the Migration To control.


You will then follow the same processes described in the “MySQL to SQL ServerMigration: How to use SSMA” blog post that I will outline below.
  1. Click on the Connect to MySQL toolbar command to complete the MySQL connection information.
    2.  Expand out the Databases node to expand the Sakila database and check the Tables folder as shown below.


      3. Click on the Create Report command in the toolbar button. You can ignore the errors. For information about the specific errors with converting the Sakila database, please refer to the blog post “MySQL to SQL Server Migration: Method for Correcting Schema Issues”. Close the report window.
      4. Click on the Connect to SQL Azure button to complete the connection to your target SQL Azure database. Use the first part of the server name and the user name for the administrator as shown below. If you need to change the server name suffix to match your server location, click on the Tools | Project Settings command, click on the General button in the lower left of the dialog and then click on the SQL Azure option in the tree above. From there you can change the suffix value. 


    5. Expand out the Databases node to see the name of the database created in the SQL Azure portal. You will see a Schemas folder under the database name that will be the target for the Sakila database as shown below. 


  6. With the Tables node selected in the MySQL Metadata Explorer, click on the Convert Schema command to create schema named Sakila containing the Sakila tables within the SSMA project  shown below. 


    7. Right click on the Sakila schema above and choose the Synchronize with Database command to write the schema changes to your SQL Azure database and then click OK to confirm the synchronization of all objects. This process creates a SQL Server schema object within your database named Sakila and then all the object from your MySQL database go into that schema.
   8. Select the Tables node for the Sakila database in the MySQL Metadata Explorer and then issue the Migrate Data command from the toolbar. Complete the connection dialog to your MySQL database and the connection dialog to the SQL Azure database to start the data transfer. Assuming all goes well, you can dismiss the Data Migration Report as shown below.


At this point, you now have all of the tables and their data loaded into your SQL Azure database contained in a schema named Sakila.

Validating the Results with the SQL Azure Database Manager

To verify the transfer of the data, you can use the Manage command from the Azure Portal and shown below. Just select the database and press the Manage command.


This will launch the SQL Azure Database Manager program in a new browser window with the Server, Database, and Login information prepopulated in the connection dialog. If you have other SQL Azure databases you want to connect to without having to go to the portal, you can always connect via the URL - https://manage-ch1.sql.azure.com/.
Once connected, you can expand the Tables node and select a table like sakila.film to view the structure of the table. You can click on the Data command in the toolbar to view and edit the table’s data as shown below.

 
The SQL Azure Database Manager will also allow you to write an test queries against your database by Database command and then selecting the New Query button in the ribbon.  To learn more about this tool, check out the MSDN topic – Getting Started with The Database Manager for SQL Azure.