
In this blog, I’m going to walk you through the process of converting the MySQL Sakila-DB sample database to SQL Server 2008 R2 Express using the SQL Server Migration Assistant for MySQL v1.0 (SSMA). The Sakila-DB database has tables, views, stored procedures, functions and triggers that make the conversion interesting. The sample is based on the Inno-DB example, but does have one MyISAM table. SSMA also allows you to migrate your MySQL databases to SQL Azure, but we’ll save that topic for another post.
Downloading SQL Server 2008 R2 Express and SSMA
The easiest way to download SQL Server 2008 R2 Express, SQL Server Management Studio and SSMA is through the Microsoft Web Platform Installer (WPI). Once you’ve downloaded WPI, you can select from a variety of tools and products that can get you up and running using IIS, PHP, and SQL Server in no time.

I’ll focus on the minimum set of tools you need to get SQL Server 2008 R2 Express and SSMA up and running. once you launch WPI, click on the Products tab at the top tool and then select Database in the navigation page. In the image above, I’ve already installed the tools, but for the new install, you’ll click on the Add buttons to the right of the circled products to get you up and running. If you are running your application under PHP, you might also want to select one of the two PHP drivers for SQL Server as well. Once you’ve selected your tools, just click on the install button to start the process.
Downloading the MySQL ODBC Driver
WPI is not without flaws. SSMA requires the “MySQL OSBC Driver 5.1 or above” download to connect to your MySQL instance that comes from the MySQL downloads site. Once at the Download Connector/ODBC page, your need to download either the x32 or x64 version of the driver based on the machine architecture for the system you are running the SSMA client. Just follow the installation instructions from the installer. The default installation settings will be good enough to get you going.
Other Helpful Downloads for SSMA and this Blog
If you don’t already have the Sakila-DB database for MySQL installed, the link to the download and instructions for installing it can be found at the blog post titled “Learn MySQL With Sakila sample Mysql Database”
Using SSMA for MySQL
SQL Server Migration Assistant (SSMA) 2008 for MySQL lets you quickly convert MySQL database schemas to SQL Server 2008, SQL Server 2008 R2 or SQL Azure schemas, upload the resulting schemas the target instance and migrate the data using a single tool.
Licensing SSMA
SSMA is a free tool, but does require you to associate a Microsoft Live ID for identification purposes. You must download a registration key. To help you with the registration process, a License Key Required dialog box opens the first time that you start the SSMA program. Use the following instructions to download a license key and associate the key with SSMA.
To license SSMA
1. Click Start, point to All Programs, point to Microsoft SQL Server Migration Assistant 2008 for MySQL, and then select Microsoft SQL Server Migration Assistant 2008 for MySQL.
2. In the License Management dialog box, click the license registration page link.
3. On the Sign In Web page, enter your Windows Live ID user name and password, and click Sign In.
A Windows Live ID is a Hotmail e-mail address, MSN e-mail address, or Microsoft Passport account. If you do not have one of these accounts, you will have to create a new account. To create a new account, click the Sign up now button.
4. On the SQL Server Migration Assistant for MySQL License Registration Web page, fill in at least the required fields, which are marked with a red asterisk, and then click Finish.
5. In the File Download dialog box, click Save.
6. In the Save As dialog box, locate the folder that is shown in the License Management dialog box, and then click Save.
The default location is C:\Documents and Settings\user name\Application Data\Microsoft SQL Server Migration Assistant\m2ss.
7. In the License Management dialog box, click Refresh License.
SSMA for MySQL User Interface
After SSMA is installed and licensed, you can use SSMA to migrate MySQL databases to SQL Server 2008 or SQL Azure. It helps to become familiar with the SSMA user interface before you start. The following diagram shows the user interface for SSMA, including the metadata explorers, metadata, toolbars, output pane, and error list pane:

Basic Steps for Migration of MySQL to SQL Server
To start a migration, you’ll need to perform the following high level steps:
1. Create a new project.
2. Connect to a MySQL database.
3. After a successful connection, MySQL schemas will appear in MySQL Metadata Explorer. Right-click objects in MySQL Metadata Explorer to perform tasks such as create reports that assess conversions to SQL Server 2008 R2 Express. You can also perform these tasks by using the toolbars and menus.
You’ll then connect to your instance of SQL Server 2008 R2 Express. After a successful connection, a hierarchy of your existing databases will appear in SQL Server Metadata Explorer. After you convert MySQL schemas to SQL Server schemas, select those converted schemas in SQL Server Metadata Explorer, and then synchronize the schemas with SQL Server.
After you synchronize converted schemas with SQL Server 2008 R2 Express, you can return to MySQL Metadata Explorer and migrate data from MySQL schemas into target database.
Let’s walk through the specifics.
Create a MySQL Migration Project
To get started, you’ll create your new project using the File | New Project command.
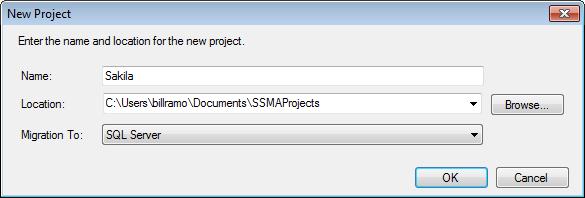
You’ll enter in your project name and then confirm that you are migrating to SQL Server. The Migrate To dropdown also allows you to choose SQL Azure, but that’s for another post. Once you make your selection, you are locked into the target backend.
Connect to a MySQL Database
To Connect to your MySQL instance, you’ll issue the File | Connect to MySQL command or click on the tool bar button that launches the following dialog:

If you forgot to to install the MySQL ODBC driver mentioned at the beginning of this blog, simply go to the download site, install the driver, and then issue the Connect to MySQL command.
Create Report of Potential Conversion Issues
Once you are connected, you’ll see the MySQL instance in the MySQL Metadata Explorer. You’ll want to expand the Databases node along with the Sakila database node and then check the box next to Sakila. This selects the database you want to migrate. Next, right click on the Sakila database and select the Create Report command or press the Create Report command on the toolbar as shown below.

Here is an example of the Assessment Report for the Sakila database.

The Assessment Report window contains three panes:
· The left pane contains the hierarchy of objects that are included in the assessment report. You can browse the hierarchy, and select objects and categories of objects to view conversion statistics and code.
· The content of the right pane depends on the item that is selected in the left pane.
If a group of objects is selected, such as schema, the right pane contains a Conversion statistics pane and Objects by Categories pane. The Conversion Statistics pane shows the conversion statistics for the selected objects. The Objects by Categories pane shows the conversion statistics for the object or categories of objects.
If a function, procedure, table or view is selected, the right pane contains statistics, source code, and target code.
o The top area shows the overall statistics for the object. You might have to expand Statistics to view this information.
o The Source area shows the source code of the object that is selected in the left pane. The highlighted areas show problematic source code.
o The Target area shows the converted code. Red text shows problematic code and error messages.
· The bottom pane shows conversion messages, grouped by message number. You can click Errors, Warnings, or Info to view categories of messages, and then expand a group of messages. Click an individual message to select the object in the left pane and display the details in the right pane.
In future blog posts, we’ll work through the specific problems that are in this report. For now, we’ll ignore the problematic objects for the schema and data migration steps. For now, close the report and then uncheck Functions, Procedures and Views nodes to take them out of the conversion. Then uncheck the tables with errors as shown below.

Go ahead and click on the Create Reports command to verify that there are no errors.
Connect to SQL Server
It’s time to connect SSMA to your SQL Server 2008 R2 Express instance. For the Server name, you’ll need the server name and instance for the target server. Since we are using the WPI installation of SQL Server 2008 R2 Express, you’ll enter in the server name as .\SQLEXPRESS.
You can select an existing database to migrate to using the Database control. You can also type in the name of a new database. In this case, use Sakila as shown below.

Once you click connect, SSMA prompts you if you want to create the database. Choose Yes to create the new database. When connecting to SQL Server Express instances, you’ll receive the following warning indicating that you won’t be able to use the server-side data migration engine. This engine is used for larger migration projects.

You can Continue from this dialog to start the actual migration process.
Convert Schema
Now that you’ve connected to the target SQL Server instance, SSMA enables the Convert Schema command. Click the Convert Schema command. Once the conversion is finished, you should see the SQL Server Metadata Explorer populated with the tables listed in bold as shown below.

Synchronize with Database
To write the tables to the target, select the dbo node in the SQL Server Metadata Explorer and then issue the Tools | Synchronize with Database command. SSMA displays the Synchronize with Database dialog as shown below. In this example, the Tables node was manually expanded to show that no tables are actually on the database at this time.

When you click OK, SSMA issues the CREATE TABLE statements to create the objects on the SQL Server target. There are some errors in this example because many of the tables selected have foreign key relationships to some of the tables that we excluded earlier. These errors can be ignored for now.
Migrate Data
The last step is to migrate the data into the tables. To complete the migration, select the Tables node within the MySQL Metadata Explorer for the Sakila database. Then issue the Tools | Migrate Data command or press the command on the toolbar. The Data Migration process requires you to connect to the MySQL database and to the SQL Server database again. SSMA then proceeds with the data migration process and displays the Data Migration Reports as shown below.

Using SQL Server Management Studio
The migrated tables are now ready on the target SQL Server instance. To see the results, launch SQL Server Management Studio (SSMS) and connect using the server name as .\SQLEXPRESS. Expand out the Databases node to see the Sakila database. Expand the out the Sakila database tables and then right click on the actor table and issue the Select Top 1000 Rows command to view the data as shown below

SQL Server Management Studio that is part of the WPI is a free rich Windows client tool from Microsoft that offers a rich development and management experience like SQLyog and MONyog.
